The installation flash drive does not boot through bios. The laptop does not boot from the flash drive. The laptop will not boot from the USB flash drive. I cannot boot from the bootable USB flash drive.
home
Welcome! This blog is dedicated to the Internet and computers, or rather was dedicated to them.
It’s probably immediately obvious that no new articles have appeared on the site for many years. Yes, this is the fate of most blogs. This project was once an ambitious undertaking, and the author, like many others writing at that time, had ambitious plans to become one of the best Russian bloggers. Well, if you look now, of those blogs that were created simultaneously with mine, most have already disappeared into eternity. And I just simply didn’t have enough time to blog. So yeah, it's not updated anymore. Although we once won the “Runet Blog 2011” competition with this site.
I even had the idea of deleting all this, but then I reviewed the old materials and realized that they could still be useful to readers. Yes, some articles are outdated (if I have enough strength, they will be marked accordingly), but the site, for example, can be useful for beginners - here you can read about the basic concepts of the Internet, learn how to set up the Internet, Windows, or even decide to switch to Linux. So take a look at the categories and choose the one that suits you.
And yet, I hope that this is more than just a blog, but a real guide to the Internet. The site can be viewed in directory mode, where all available articles are structured by categories. And, who knows, maybe one day new high-quality articles will start appearing here.
Sander
Modern Android phones are more than just phones. You get used to the set of installed programs, the history of your calls and text messages, your collection of photos and much more. But time passes, and the device you were completely satisfied with begins to slow down, glitch, or simply loses its presentable appearance due to chips on the body or scratches on the screen. The question arises of choosing a new phone and changing the Android phone. And if we ignore the issue of choice for now, then “moving” to a new phone remains a serious problem - you absolutely don’t want to start all the data from scratch. This is what we will talk about today.
Most of the readers of this blog have most likely never encountered version control systems and will not encounter them in the near future. It's a pity. This extremely convenient invention is quite widely used by programmers, but, in my opinion, it could also be very useful for those who actively work with texts. But, probably, now there is not a single version control system that would be easy to start using for “office” (Microsoft Office) work. Nevertheless, I think that the material presented in the article may be of interest to all readers.
If you have been wondering how to watch movies online and access the Internet from your TV, this article is for you. No, I know that some TVs already have Smart TV functionality, but I have never seen it work properly. Apparently, this is why Google recently demonstrated an absolutely stunning device that immediately became a sensation. We're talking about the Chromecast media streamer, a more advanced and affordable version of last year's disastrous Nexus Q player.
The Chromecast dongle, whose dimensions do not exceed 2 inches, connects to the HDMI port of the TV and allows you to enjoy watching streaming web content. To control the streamer, you can use any device (tablet, PC, smartphone) based on the operating platform iOS, Windows, Android or Mac OS.
This article is devoted to the design of Android system memory, problems that may arise due to its lack and ways to solve them. I myself recently encountered the fact that my Android phone began to regularly display messages about low memory when I tried to install this or that application. Which was very strange for me, given that according to the description on the market there should have been about 16GB, and I also increased this volume using an additional memory card. However, there was a problem, and it took a lot of fiddling around before I found the right solution that didn’t require root access or completely restoring the phone to its factory state.
Already created a bootable USB flash drive, but don’t know how to boot from a flash drive? There is nothing complicated here. Booting Windows from a flash drive is very simple, and to do this you just need to go into the BIOS and change one setting.
If you have not yet recorded a licensed digital copy of Windows, I recommend reading -?
How to configure booting from a flash drive?
If you simply connect a USB flash drive to your PC or laptop and reboot it, Windows installation will not start. After all, to do this you need to enable booting from a flash drive in the BIOS.
This is easy to do. But there is one nuance here. The fact is that loading Windows from a flash drive on PCs and laptops is carried out differently. Firstly, it depends on the BIOS manufacturers. And, secondly, from the laptop brand (Asus, Acer, Samsung, Lenovo, HP, etc.).
Yes, the BIOS menu will always be different, and this can cause difficulties. But below we will look at several examples so that you understand and can independently navigate the BIOS menu (in case you have another option).
So, let's begin. To enter the BIOS, you must immediately press a certain button on the keyboard when you turn on your computer or laptop. Which one? This can be found on the loading screen.
You can find out that you have entered the BIOS by seeing the corresponding menu in front of you. The following options are usually found:


If loading the BIOS failed, then wait until the PC or laptop turns on, reboot it and try again by pressing a different key.

In this case, the “Boot” item was selected, and then “Boot Device Priority” (i.e., device startup priority). As a result, a menu similar to this will open:


As you can see, they are different, but in each case there are the lines we need - First (1st), Second (2nd) and Third (3rd) Boot Device. It indicates which device boots first, which is second and third in turn. As a rule, the hard drive (HDD) always comes first, followed by the disk drive (CR-ROM).
When you connect the flash drive, the USB-HDD option will also appear. You need to select the option USB-HDD in the First Boot Device item. Example:

Next, you must save the changes, otherwise you will have to repeat everything all over again. Which save button? This information is written at the bottom of the screen. For example, in the screenshot above: F10 – “Save”, ESC – “Exit”. Save the changes and exit the BIOS. Congratulations, setting up the BIOS to boot from a flash drive is complete.
The computer (or laptop) will automatically reboot, after which the following line will appear:

Press any button and Windows installation will begin.
If you have a BIOS UEFI then everything is as easy as shelling pears
Go to BIOS and you will see something like this:

To configure booting a flash drive into UEFI, we are interested in the “Boot Priority” item. Drag the USB device icon to the top of the list (so that it is first) and exit (exit button in the upper right corner). When you exit, the system will ask you whether to save the changes. You agree, after which the PC or laptop will reboot.
By the way: it doesn’t matter at all what kind of image you have on a USB flash drive - Windows 7, 8, 10 or XP. This doesn't affect anything. The OS will start loading from the flash drive in any case (provided, of course, that it is recorded correctly).
And finally, one more very important point. When the Windows files are unpacked, the computer will reboot.

After this, you need to go into the BIOS again and return the previous device startup priority. That is, put the hard drive (HDD) in first place, and the USB flash drive in last place. There shouldn't be any problems with this.
In principle, you don't have to do this. In this case, when the black screen appears, NOTHING don't press.
Otherwise, the Windows installation will boot again and you will install the operating system again.
But when Windows is installed, you still need to go into the BIOS and return the previous device startup priority. Otherwise, the computer (or laptop) will always load data from the flash drive first (provided it is connected).
Instructions
To open the BIOS, press Del after you turn on the computer and before the operating system starts loading. You may need to press a different key to enter the BIOS on your computer. In the lower left corner when checking RAM there is the inscription Press Del to enter setup. If another key is written instead of Del, press it.
The BIOS window opens. You need to control the BIOS using arrow keys and the Enter and Esc keys. Basic parameters for equipment: Disabled – disable, Enabled – use. Depending on the manufacturer and model, the versions and directory names in the BIOS may differ. The following are the most common names.
In the Advanced menu (Advanced BIOS features) you can prohibit or use the USB controller under the USB Functions command (USB Controller/USB Ports/USB Device/Integrated (OnChip) USB Controller). The Enabled/Disabled command turns all USB ports on/off, Both makes all ports available, Primary makes ports on the rear panel only available. 2/4/6/8 USB Ports – number of ports available for operation.
USB 2.0 Controller (High Speed USB/USB 2.0 Supports/USB 2.0 Device). Option to disable or allow the use of USB 2.0. USB 1.1/2.0 Controller item for using all USB controllers, commands: All Disabled - disable everything, All Enabled - enable everything.
USB Speed. An option that changes the operating frequency of the USB bus. Its parameters: 24 MHz and 48 MHz.
Legacy USB Support (USB Device/USB Driver Select/USB Function to DOS/USB Keyboard(Mouse) Support). Section for USB keyboard/mouse support at the BIOS level. The Enabled/Disabled command – enables/disables support, Auto – disables standard keyboard/mouse when USB devices are connected and vice versa, OS – provides support for the operating system, BIOS – provides support for the motherboard BIOS.
Port 64/60 Emulation (USB 1.1 64/60 Emulation) – an option for optimizing devices connected to the USB port in legacy OS. Enabled/Disabled command – turns it on/off. Emulation Type (UFDDA USB Floppy/ UFDDB USB Floppy/ USB Mass Storage Emulation Type/ USB Mass Storage Device Boot Setting) – with different values of the option, the USB drive is emulated in Auto mode – detected automatically, Floppy (FDD Mode or USB Floppy) – as removable media, Forced FDD - like a floppy disk, Hard Disk (HDD Mode or USB HDD) - like a hard drive, CDROM - like an optical disc drive.
To boot the OS from a USB drive, go to the Boot menu (or find First Boot Device in Advanced BIOS features). In the Boot Device Priority section, select 1st Boot Device, then check the box next to the name of your device, or opposite the USB-HDD item.
BIOS is a set of microprograms located on a memory chip located on the computer motherboard. When you turn on the computer, even before loading the operating system, the BIOS recognizes installed devices, checks their functionality and starts them with the specified settings. USB support in the BIOS should be enabled in most cases, because... many devices use this interface to connect to a computer.
Instructions
Enter the BIOS Setup Utility. To do this, you need to press a specific key or key combination after turning on the computer when checking devices, before loading the operating system. The most common option is to press the Delete, or Del, key. To find out which key to press in a particular case, carefully observe the text on the screen when you turn on the computer. One of the lines will have a hint that reads something like this: Press F2 to enter Setup.
Find the menu item that will contain the setting responsible for enabling USB support in the BIOS. Depending on the BIOS manufacturer, this item may be called differently. Common options are Integrated Peripherals, Peripherals, Advanced. If there is no such item, try going to other sections - in one of them you will find the required item from the next step.
Select the option that directly affects the USB controller. It may also have different names in different BIOS versions. But its name will definitely include the word USB, for example, USB Controller, USB Device, USB Function, OnChip USB, Onboard USB Device. It can be located either directly in the previous paragraph or in the sub-item Onboard Device, USB Configuration, OnChip Device.
How to reinstall Windows or attempt to revive the operating system using Live disks if the laptop does not boot from a flash drive? This does not mean rare devices, which in principle do not support booting from USB drives, but modern laptops, which allow booting from a flash drive, but do not offer a clear mechanism for setting boot priority from the start. Using one of the tested Asus models as an example, below we will understand the specifics of booting modern laptops from a flash drive and consider common reasons why problems may arise with this matter.
1. Setting boot priority in the hard drive selection menu
The inability to prioritize booting a BIOS flash drive is a problem not only for laptops, but also for PCs, and it is usually due to the fact that many programs for writing bootable media create a bootable flash drive based on the principle of a hard drive. In such cases, the flash drive is not included in the general list of boot device priorities; you need to look for it in a separate menu, where the priority hard drive is determined. In this menu, connected USB media are listed as hard drives along with the laptop’s internal storage devices – HDD or SSD. But even users who have previously encountered this nuance may not remember it, since they may be misled by the fact that in the BIOS UEFI the flash drive is listed as a UEFI boot device (with the addition “UEFI” in front). It appears, but in fact the laptop does not boot from such a flash drive. If the bootable flash drive is not UEFI or we are dealing with a laptop based on a regular BIOS, the flash drive needs to be set in the hard drive priority menu. For example, in the Asus laptop we are testing, you need to go to the “Boot” section and install the hard drive in the “Boot Option #1” column.
Then go down to the “Hard Drive BBS Priorities” column.
And choose a flash drive.
 3
3
In the general list of boot devices, the flash drive will not be listed as a UEFI device, and boot will take place from it.
 4
4
But it will be implemented subject to the active compatibility mode with Legacy.
2. Enabling support for USB storage devices in BIOS Legacy mode
4. Switching the flash drive to a USB 2.0 port
Many modern laptops have a USB 3.0 port (with a blue tab). This is a great advantage when it comes to working with USB devices inside Windows, but problems may arise when booting computers from flash drives that do not have drivers supporting USB 3.0 in the distribution. These distributions include official ISO installation images of Windows 7 (and versions below), as well as builds of some, usually older, Live disks. A difficult way to solve this problem is to integrate USB 3.0 drivers into the distribution and repackage the ISO image. Simple and recommended - connect a flash drive to a USB 2.0 port on a laptop. Only the USB port on the laptop matters; the fact that the flash drive itself supports USB 3.0 does not play any role. Learn more about the differences between USB 2.0 and 3.0 ports.
Have a great day!
It so happened that recently, several times in a row, I immediately encountered the fact that when I tried install ISO images from a flash drive I couldn’t do this with various programs in Windows 10. After startup, either a cursor on a black screen or various inscriptions appeared on the monitor. Everything stopped there; attempts to wait for a while led to nothing. Nothing was loading. Installing an image from a USB drive simply froze without starting. I tried for a long time to find all sorts of solutions to this problem: I formatted the disk, downloaded the images again, re-uploaded them to other flash drives - but it was all in vain. From this I concluded that the problem, apparently, is not at all in the files or in my USB storage.
I began to guess that the problem lay in the structure of the flash drive itself. As usual, I began to google solutions to such problems. And I found a solution that has helped me out several times already. The great advantage of this method is that it is already Windows 10 ISO image recorded on a flash drive There is no need to delete it, nor do you need to format the USB drive itself.
The point, apparently, is that when creating a bootable flash drive, we use a variety of programs to write ISO images. We often abuse the same drive with these experiments more than once. As a result, the internal layout changes, additional sectors invisible to us may appear, and existing ones may be modified. How exactly and why this happens is not important to us, as amateurs in general. It is important that neither deleting files from a flash drive, nor even completely formatting a USB drive often helps resolve this issue.
Of course, my solution to the problem with inability to load an ISO image from a flash drive far from the only one. Perhaps your reason will be completely different. But, nevertheless, since my method described below helped me personally, and more than once, I decided to write about it on my website.
So, if you have Windows 10(or any other ISO image) no way does not want to boot from a USB drive, then you need to work with this flash drive on any computer with Windows 7, 8 or 10 installed. What is especially attractive to me personally is that we will carry out all manipulations with our removable storage exclusively using the built-in tools of the operating system itself from Microsoft, then eat without downloading and installing any third-party programs, which means without the threat of catching something painful, which, of course, we don’t need. It is also IMPORTANT that it is NOT NECESSARY to delete the ISO image already recorded on the flash drive!
Step 1: Working with flash drive partitions
First, let’s check whether any additional partitions have appeared on the flash drive during operation and numerous rewrites. To do this, in any of the above operating systems, use a search to find the utility “ Creating and formatting hard disk partitions" We just start typing its name in the search bar of the Start menu (“Creating and formatting...”) and it’s found. Let's launch this tool that helps you manage any disk space. Finding your USB drive ( Disc 1 in the image) and make sure that there is only one partition on our flash drive, and not several (as, for example, I have on Disk 0). If there is only one section, go to the next step.

If there are several sections, then determine which one is the main one. This can be done by size - the main partition on our flash drive (with the Windows 10 image or any other software) is the one whose volume matches the one displayed in Explorer. Then, in turn, stand with the mouse on each additional partition and use the right mouse button to open the menu in which we select “Delete volume”. As a result, we have unallocated (unallocated) space. It is painted black, not blue. To add it to the main partition, you need to stand on the main partition and select “Extend volume” with the right mouse button. We add all the freed space there. After that our You can now try downloading the ISO image from the flash drive again on the computer. If there were several sections, then perhaps this was the problem, why the Windows 10 image did not want to boot from a flash drive. However, personally, for the sake of reliability and saving time, I immediately recommend doing the next step No. 2.
Step No. 2 is below, but for now a small digression: If some partitions on the flash drive are inactive and during the first step they could not be removed by any force, then all that remains is to completely format your USB drive. To do this in Windows 10, in my opinion, the easiest way is to use the program HDD LLF Low Level Format Tool. Let's move on to the official website, scroll down the page to the phrase “Download Windows Installer (most people will want this option)” - it is located immediately below the social buttons. Download a file whose name ends with setup. Install and launch the program. After launch, select the third item “ Continue for free" (1). In the window that opens, find your flash drive (select by capacity in the far right column CAPACITY), select it and click “Continue” (2). Next, select the second tab LOW-LEVEL FORMAT (3) and click in it FORMAT THIS DEVICE(4). The process of completely reformatting a flash drive using this program takes a lot of time. But the result never gave me any complaints.

Step 2: Make the partition with the ISO image active
At this stage, using the command line in Windows let's designate the only partition on our flash drive as active(what else it could be and why it doesn’t matter to us). To do this, again, through the search for the Start menu, find and run with administrator rights (right mouse button) utility " cmd"(in the search we type these three abusive letters without quotes).
- We make sure that our flash drive is inserted into the USB port and type in the command line “ diskpart", press Enter.
- Next, enter “ list disk" + Enter. With this command we display all drives connected to the computer in the form of a list. We determine by size which one is our flash drive and remember the number. In my case it is “Disk 1”.
- Now select our disk. To do this, type “ select disk=X"(X is the number of our flash drive, which we remembered at the previous stage - for me it is 1). Press Enter.
- Next, enter the command “ list partition" + Enter. Thus, we display all the partitions already inside our flash drive (there should be one and only “Section 1.”)
- Now we need to focus on this single section. To do this, type “ select partition=1", press Enter.
- The last command we type to make this section active is: " active"+ press Enter as always.
As an example of what the whole process should look like activating a partition of our flash drive, below is a screenshot from my own example of such work on the Command Line.

Of course, it is likely that this instruction will help with problem with launching Windows 10 ISO image(or any other software) from a flash drive, it’s far from 100 percent. However, personally, this method helped me in the vast majority of cases. As a rule, it became the last one after numerous attempts to rewrite images and boot from different USB drives. Let me remind you that it is not at all necessary to delete an already recorded image from a flash drive when carrying out the above manipulations. And, in my opinion, it’s even better not to do this, since it is unknown how the image recording program will mark up our active partition on the flash drive.
A flash drive is an information storage device that connects to any PC via a USB interface. Quite often this device stops working normally. What should I do? Below will be discussed the most effective ways to treat flash drives and corrections of common errors when working with the device.
Follow all the steps sequentially - if the first method does not help, move on to the next one and so on.
What to do if the flash drive stops working
In the modern IT industry, the KISS principle is relevant in a narrow circle, meaning “Keep it simple!” Without special need, there is no need to edit the registry, use complex hardware methods for troubleshooting problems, or try to implement other procedures - you should start with the simplest steps.
- Try connecting the flash drive to another PC, laptop or other device for communication via a USB interface. If the flash drive does not work, then with 100 percent probability we can say that this is the problem - and it is necessary to immediately go to utilities for restoring and fixing a flash drive.
- If the flash drive works on another computer or is at least detected by Windows (but “Explorer” and “This/My Computer” do not appear), then you need to Troubleshoot problems with the OS or file system using the instructions below.
- Disconnect the drive by removing it from the USB connector.
- Shut down your PC by selecting the “Shut down” option.
- Disconnect the system unit from the 220V power supply, press the power button for 5 seconds – this will remove the residual charge on individual modules of the motherboard.
- Connect your computer to power.
- Turn it on, wait until it loads completely and insert the USB flash drive.
- Try connecting it to a different connector, especially if remote front USBs were previously used for this task. The best option is the rear ports
- Sometimes the cause of flash drive malfunctions is the assignment of system ID in the form of a letter, or the disappearance of this parameter altogether, to fix an OS problem, use the Disk Management utility

Utilities for flash drive recovery
Be sure to check the flash drive through utility“USB Troubleshooter” from Microsoft – it is not included with the OS, but is available for download from the official portal here free and only works with OS W7 and higher.
It’s easy to use – run the program and click “Next”. 
After which the software will try to find and fix typical problems with displaying the flash drive in the system. 
If you hear a characteristic sound when connecting a device, but it does not appear in Explorer, then open Device Manager.

Often problem reading USB flash drives appears after updating the operating system - it is provoked by incorrect entries in the registry left after connecting physical storage media.
Searching for them manually takes quite a long time and is better use a special program for searching and clearing non-working keys in the registry.
Best suited for this Vit Registry Fix utility
(free and does general search and cleanup) And utility
USBOblivion
(free and clears all data on previously connected flash drives from regedit).
Main advantages:
The interface is intuitive and has Russian localization.
Download the program, run an automatic search, after it is finished, start cleaning (after checking the boxes in the sections about saving all changed .reg keys in the archive, in order to “roll back” the operation if necessary).
Sometimes the flash drive does not work due to driver incompatibility for USB 2 and 3 versions. In this case, you need to download updated versions from the official website of the motherboard manufacturer.
Why doesn't it see the flash drive? If the PC does not accept any flash drives, then you need to completely reinstall all drivers for USB drives.
The easiest way to do this is through the “Device Manager” (hold Win + R and enter devmgmt.msc, click on “OK”). Find the “USB Controllers” section in the drop-down list and sequentially delete (right-click on the object, select “Delete”) the subsections USBHostController, GenericUSBHub and USB Root Hub, then update the current hardware configuration and restart the PC.
As an add-on, run a full system scan.
- Launch the registry (hold Win+R, enter regedit and confirm the action by clicking “OK”).
- Right-click on the HKEY_CURRENT_USER section and select Find, then type Explorer in the search field. If the folder contains NoDrives, then you need to select and delete it (using the Delete button). In addition, in the same registry editor, search for the StorageDevicePolicies parameter (under the HKEY_LOCAL_MACHINE section) and delete it (if present).
Sometimes all the above methods do not give any tangible result.
If the flash drive is identified in the system (at the level of identifying an unknown connected device), then you can try to restore normal operation of the device, formatting it in a special way using a third party HDD Low Level Format Tool utility .
In this case, working with the device occurs at the level of physical sectors, and not the file system (as with standard formatting), which guarantees:
- Wiping bad sectors
- Elimination of any software problems
- Permanently deletes all data from the storage device.
The program is free and available for download from the official website. After installing and launching it, select the required drive, click Continue. 
Find the Low-levelFormat tab and accept the operation by clicking on Formatthisdevice.  The duration of the procedure depends on the type of flash drive and its capacity, on modern PCs the process takes on average 30-60 minutes. Once completed, you should safely remove the device and restart your computer.
Update 2016: The guide added ways to boot from a flash drive in UEFI and BIOS on new computers with Windows 8, 8.1 (which is also suitable for Windows 10). In addition, two methods have been added to boot from a USB drive without changing BIOS settings. Options for changing the order of boot devices for older motherboards are also present in the instructions. And one more important point: if booting from a flash drive on a computer with UEFI does not work, try.
In different cases, in order to get into the BIOS setup utility, you need to perform essentially the same actions: immediately after turning on the computer, when the first black screen appears with information about the installed memory or the logo of the computer or motherboard manufacturer, click the desired button on the keyboard - the most common options are Delete and F2.
Press the Del key to enter the BIOS
Typically, this information is available at the bottom of the initial screen: “Press Del to enter Setup”, “Press F2 for Settings” and similar. By pressing the right button at the right moment (the sooner the better - this must be done before the operating system starts loading) you will be taken to the settings menu - BIOS Setup Utility. The appearance of this menu may vary; let’s look at a few of the most common options.
On modern motherboards, the BIOS interface, or more precisely, the UEFI software, is usually graphical and, perhaps, more understandable when it comes to changing the order of boot devices.

In most options, for example on Gigabyte (not all) or Asus motherboards, you can change the boot order simply by dragging the disk images accordingly with the mouse.

If this is not possible, look in the BIOS Features section, in the Boot Options item (the last item may be located in a different place, but the boot order is set there).
Setting up booting from a flash drive in AMI BIOS

Please note that in order to perform all the described steps, the flash drive must be connected to the computer in advance, before entering the BIOS. To set boot from a flash drive in AMI BIOS:
- In the menu at the top, press the “right” key and select “Boot”.
- After that, select the “Hard Disk Drives” item and in the menu that appears, press Enter on “1st Drive”
- In the list, select the name of the flash drive - in the second picture, for example, it is Kingmax USB 2.0 Flash Disk. Press Enter, then Esc.


Next step:
- Select “Boot device priority”
- Select “First boot device”, press Enter,
- Again, specify the flash drive.

If you need to boot from a CD, then specify the DVD ROM drive. Press Esc, in the menu at the top from the Boot item, move to the Exit item and select “Save changes and exit” or “Exit saving changes” - when asked if you are sure If you want to save the changes you have made, you will need to select Yes or type “Y” from the keyboard, then press Enter. After this, the computer will reboot and begin using the flash drive, disk, or other device you selected to boot.
Booting from a flash drive into BIOS AWARD or Phoenix

In order to select a device to boot into Award BIOS, in the main settings menu, select “Advanced BIOS Features”, then with First Boot Device selected, press Enter.

A list of devices from which you can boot will appear - HDD-0, HDD-1, etc., CD-ROM, USB-HDD and others. To boot from a flash drive, you must install a USB-HDD or USB-Flash. To boot from a DVD or CD - CD-ROM. After that, go up one level by pressing Esc, and select the menu item “Save & Exit Setup”.
Setting up boot from external media in H2O BIOS

To boot from a flash drive into the InsydeH20 BIOS, which is found on many laptops, in the main menu, using the “right” key, you need to go to the “Boot” item. Set External Device Boot to Enabled. Below, in the Boot Priority section, use the F5 and F6 keys to set External Device to the first position. If you need to boot from DVD or CD, select Internal Optic Disc Drive.
After that, go to Exit in the menu at the top and select “Save and Exit Setup”. The computer will reboot from the desired media.
Boot from USB without entering BIOS (Windows 8, 8.1 and Windows 10 with UEFI only)
If your computer has one of the latest versions of Windows installed, and the motherboard has UEFI software, then you can boot from a flash drive without even entering the BIOS settings.
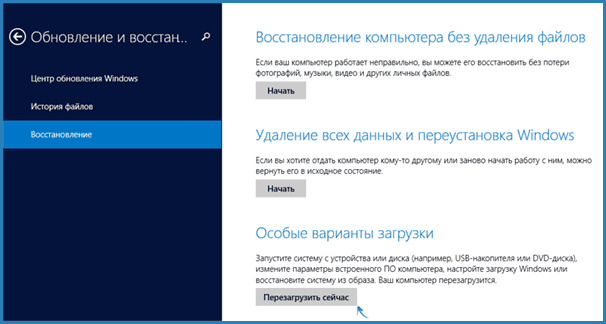
To do this: go to settings - change computer settings (via the panel on the right in Windows 8 and 8.1), then open “Update and Recovery” - “Recovery” and click the “Restart” button in the “Special boot options” item.

On the “Select Action” screen that appears, select “Use device.” USB device, network connection, or DVD."

On the next screen you will see a list of devices from which you can boot, which should include your flash drive. If suddenly it is not there, click “View other devices”. After selection, the computer will reboot from the USB drive you specified.
What to do if you can’t enter the BIOS to boot from a flash drive
Due to the fact that modern operating systems use fast boot technologies, it may turn out that you simply cannot enter the BIOS in order to somehow change the settings and boot from the desired device. In this case, I can offer two solutions.
Second, try disabling Windows fast boot, and then enter the BIOS in the usual way, using the Del or F2 key. To disable fast boot, go to Control Panel - Power Options. In the list on the left, select “Power button actions.”

And in the next window, remove the “Enable fast startup” item - this should help in using the keys after turning on the computer.
As far as I can tell, I described all the typical options: one of them should definitely help, provided that the boot drive itself is in order. If suddenly something doesn’t work out, I’ll wait in the comments.